- Details
- Category: Feedback
- Hits: 9519
Crossing the Lofoten Islands from North to South
Introduction
My name is Geoffrey, I am 29 and am passionate about the great outdoors. I have been hiking either alone or partly with groups for nearly 10 years now. For several years I have had a yearning to make a crossing on foot alone somewhere where there are mountains. Completely by chance, earlier in the year I came across a gallery of photos of the Lofoten Islands (Facebook page of the Trek (hiking) and/or Terres d’Aventures (Land of Adventures) journal) taken last February/March, I was speechless: it was exactly what I was looking for!
I began to look into it, buying 1/50,000 maps, doing searches on the internet… until I found this great site, completely free: Rando-Lofoten.net. By asking questions on the forum, I received informative, professional answers from David and Magdalena, the site administrators (the Exploranor company) who have lived in the Lofoten Islands six months of each of the last 12 years. I eventually got my plane tickets and booked from 18 July to 2 August 2013. A few more finishing touches and I was finally ready.
The site administrators were quick to reply and their detailed answers were a great help to me in preparing my crossing of the Lofoten Islands. Even though I say “my” crossing, it’s not entirely true. 80% of my trip was based on David and Magdalena’s suggestions, and in the end I only made slight changes. I did, however, find a few areas for improvement which I will suggest shortly (after I’ve checked with the right people that it’s OK!).
The crossing ended in Sorvagen, where the rorbus are located that David and Magdalena run as part of their Exploranor work. I was able to meet them in the flesh, as well as the guides that supervise the groups. I would like to take this opportunity of saying “thank you” and congratulating the entire team with whom I’ve had such a good time!
I promised to provide feedback on my experience of crossing the Lofoten Islands. Both for myself and the site: for myself because it was the occasion to keep a permanent record of this fantastic trip; and for the site because it’s designed to enable people to pool their experience and I was determined to make my information available to everyone. My blog will shortly appear on the Rando-Lofoten site which has kindly offered to host me. This will include an account and detailed report of the crossing, preferred routes and possible alternatives, perhaps a video project (if I can manage it!).
But all that needs a lot of work, and it’s not how I earn my living. Together with David and Magdalena we have decided to give you a little foretaste of my feedback to give you an idea. It’s only an appetizer and I promise that the rest will be on its way shortly.
Here then is an initial description of the route and my immediate overall impressions. (To follow my route on a map, see the map references on the site). Without saying any more before I give a complete account of the crossing, which will be uploaded shortly, I’d like to give anyone considering venturing in the Lofoten Islands a few essential items of information, in no particular order: the characteristics of the terrain and their impact, the unpredictable nature of the trails, vital requirements for such a crossing, a few tips and, of course, a few of the aspects that made the greatest impression on my journey.
I would point out that the trip is organised as follows: arrival in Svolvaer on day 1, the crossing begins the following day and continues until day 10 or 11 (depending on whether you opt for the alternative day 10).
I hope you enjoy my account and, above all, have a good trip!
Description of the route (the hiking guide will be a little more detailed and include maps and routes)
DAY 1
Description: Arrive at Svolvaer at 17h56. The shops close at 11 pm: perfect for buying supplies on site. There are cash machines in the town centre (unusual in the Lofoten Islands).
Bivouac: Sandsletta campsite
Supplies: Preferably in Svolvaer
Logistics: The crossing begins in Delp to the north of Matmora. Ideally you should try to reach the Sandsletta campsite (I hitchhiked). You can then ask Beate (the campsite manager) whether she knows of anyone going to Delp the next morning (she suggested someone when I was there).
Alternative: Sleep in Svolvaer and take the bus to Laukvik from the market place (line 18-733 at least in summer).
DAY 2
Itinerary: From Laukvik go to Delp – Hike up Matmora – Go down to Sandsletta – Bivouac in Haugen if possible, otherwise between Sandsletta and Haugen
Description: Beautiful mountain hike (mountain ridges, summits, lake, forest and fjords). From Delp to the north of Austvagoya climb on the southern face of Matmora (788 metres) to the summit. Then descend via the Rangeldalsvatnet lake. There is then a short section of road before you get to the Sandsletta campsite (not a very busy road).
Bivouac: Sandsletta campsite (allow for 80 to 90 Kr for a tent).
Duration/degree of difficulty: allow 6 hours for this hike (or 7 maximum). No particular obstacles. Approximately 800-metre climb.
Supplies: At the Sandsletta campsite as well as bread, cheese and a little cold meat you can also have breakfast.
Logistics: Nothing to report.
DAY 3
Itinerary: From Sandsletta to Haugen head southwards towards Isvatnet – Possibility of climbing Rundfjellet and descending to Kleppstad via Olderfjord (west facing).
Description: From Sandsletta campsite follow the road for approximately 800 metres, then take the track towards Augen on the right until you reach the trail leading to the Rundfjellet mountain range. Reach the lakes of Itsvatnet and Botnvatnet where the terrain is very alpine (scree, lakes, rugged granite summits). Then descend, off-piste, by the pass leading to Olderfjord. Descending via the pass is not easy, then you have to climb the entire valley which is an immense peat bog, particularly when it is raining. This section is long and tiring. Prepare to get your feet wet. The end of the hike is more pleasant, if rather long: head westwards along the right-hand shore of the Olderfjord until you find the track then the road to Kleppstad (short section of road to finish). To sum up, it’s a challenging hike with a beautiful mountain section followed by a more uncomfortable wilderness. In bad weather it can be hard to keep your spirits up!
Bivouac: The best I could find on this rainy night was the awning at reception for campervans… I don’t recommend it. But you should be able to pitch your tent near the bridge leading to Gimsoy.
Duration/degree of difficulty: Without doubt the hardest hike of the route. It is long, allow 8 or 9 hours. Even though there is not much of a climb (approximately 600 metres) the terrain is very demanding and exhausting, particularly in damp or rainy weather. Long peat bog crossing to reach Olderfjord so you must like having wet feet. It’s impossible to camp in this valley. The trail disappears at Bostvanet (a third of the way along the route).
Supplies: No.
Logistics: Contrary to what the map says there is no trail in Olderfjord. Depending at the time you arrive you may be able to hitch a lift in the small car park which the trail opens onto (the track begins here).
Alternative: the hike may include climbing Rundfjellet (allow two hours extra). Bear in mind this makes it a very long day!
DAY 4
Itinerary: From Kleppstad, hitchhike to the second bridge (route E10). Then take the 815 road that descends southwards to Vikjorden.
Description: Road stage. This is a connecting stage on a road which is not very busy and which is very short. I believe there is a mountain alternative but I don’t know whether it’s OK.
Bivouac: Around Vikjorden.
Duration/degree of difficulty: Allow 2 hours if you manage to hitch a lift but 4 hours if you have to walk the entire distance.
Supplies: No.
Logistics: It is better to hitchhike across Gimsoy and to get dropped off at the second bridge.
Alternative: at the bridge head westwards across the meadow, even though it is hilly, to the lake of Haugvatnet (if necessary following the power lines) – descend south/south west heading east of Molandstjorna to the pass (MortenSkardet) then take up the trail again to the summit (Varden) – Go back down to Moland then Vikjorden.
DAY 5
Itinerary: Leaving Vikjorden, take the trail that climbs to Lyngedalsvatnet then walk to Urdtjorna (small lake) – descend west/south-west (going south of Urdtjorna) then climb Dalstuva – go back down the summit via the trail on the ridge then reach the radio transmitter where the descent to Brustranda begins.
Description: A magnificent mountain hike. You feel alone in the world. There is not always a trail, but the terrain can be walked on and poses no particular obstacles (other than damp in bad weather). Fabulous views over the Haveren mountain range and foothills of Austavagoya, many small lakes…
Bivouac: Brustranda campsite (allow for 100 to 110 kr).
Duration/degree of difficulty: approximately 800 metres climb. Even so, you should allow 7 hours. No particular obstacles, the direction is fairly clear.
Supplies: No, but breakfast is possible at the Brustranda campsite.
Logistics: Nothing to report.
Alternative: Climb Trollsdalstinden, which seems feasible without taking any risks.
DAY 6
Itinerary: From Burstranda, follow the trail that heads west north west until it meets another trail (Gjestberg) – take the trail that heads south west – climb Kartstaven – take the trail to Krenggarsvatnet – when you are about to drop below approximately 200 m altitude, head west towards Leknes via the meadow to reach a trail that goes straight to the town centre.
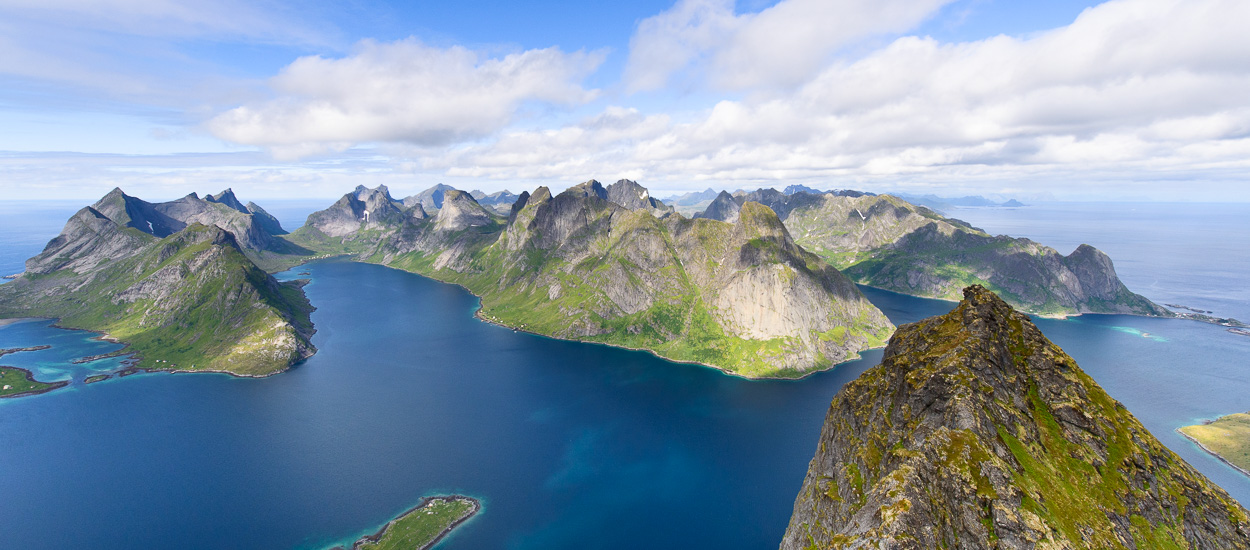
Description: This is the “summit” stage of the crossing! You can do one summit after the other if you are fit enough. These are beautiful granite mountains covered with heather. This hike offers outstanding panoramic views of three islands (Moskenes, Vestvagoya, Austvagoya).
Bivouac: Around Leknes.
Duration/degree of difficulty: 7 hours without Justadtinden, at least 10 hours including the summit.
Supplies: Yes, in Leknes (the town is a huge shopping mall anyway).
Logistics: quite a long stretch of hitchhiking to look forward to between Leknes and Napp, in other words from Vestvagoya to Moskenes. Pedestrians are not allowed in the tunnel anyway. There are also buses, it may be worth finding out.
Alternative: It is possible to include climbing Blatinden, and why not Justadtinden for hardened walkers (add at least 3 to 4 hours…). What’s more, depending on the weather and season, it’s possible to sleep under the stars on one of the summits you climb in the day (the view from Karstaven is great!) and to enjoy the Midnight Sun! If you want to stick to the schedule, the hike for the next day is a bit long…
DAY 7
Itinerary: From Napp, follow the trail southwards along the coast to Nusfjord.
Description: A magnificent coastal trail that offers a wide range of views. It’s one of my favourite hikes. You pass from one type of terrain into the next: dwarf birch forests, cottages, hollows, fjords, mirror-like lakes, peat bogs and sometimes swamps (at least that’s how it can seem!), granite plateaus and majestic mountain landscapes, before you reach a picturesque fishing village (which is still, nevertheless, a rip-off tourist site)…
Bivouac: Around Nusfjord.
Duration/degree of difficulty: allow for 8 hours as you will sometimes lose sight of the trail. If you get stuck trying to find your way on the map you can head west across the plateau, you will easily find a path to walk on. And the view from up there is staggering! The route climbs only a few hundred metres at most. Even though the end of the hike may feel safer on the road there is nevertheless a trail that climbs slightly.
Supplies: Yes, it’s possible, but I strongly advise against it. The prices are exorbitant, it’s terrible. A tourist rip-off joint if ever there was one.
Logistics: Just so that you know, there is a charge for entering Nusfjord … I think there may be a way of avoiding the entrance where you have to pay, but I haven’t checked it out (I got to Nusfjord at 3 in the morning and didn’t pay anything because the checkout was closed!).
Alternative: No need for an alternative on this hike!
DAY 8
Itinerary: From Nusfjord head south west on the trail along the coast – in Nesland pick up the road and make your way to Ramberg (6 km of road)
Description: A very nice small coastal trail, but which is very busy, beautiful views over the coast and sea, with a “southern” feel to it! Then it’s a track from Nesland, but the environment is spectacular. You finish on a section of road the very end of which is on the E10… But there is no other way (unless you hitchhike).
Bivouac: Ramberg campsite.
Duration/degree of difficulty:
Supplies: Ramberg (supermarket).
Logistics: If you sleep over in Ramberg, you will have to hitchhike back to Fredvang (this section of the E10 is terrible…). There may be buses, it’s worth finding out.
Alternative: It is possible to camp in or around Fredvang because Ramberg campsite is not great (you will need supplies though). It’s nice to hitchhike back to Fredvang to sleep once you have done your shopping!
DAY 9
Itinerary: From Fredvang, cross the meadow to meet up with the trail – climb the pass on the trail then go down to Kvalvika beach. Go to the other side of the beach and climb the pass on the trail, walk the length of Agvatnet lake and follow the trail until you reach the track at Marka. Follow the road to Selfjordhytta. After the small forest on the shore of Selfjord you will find a shelter where you can sleep.
Description: an impressive, varied hike: the golden sand beaches of Kvalvika and its turquoise lagoons, Vestfjord and the surrounding mountains, dwarf birch forests and mountain lakes, a little peat bog nevertheless… a very rich hike!
Bivouac: On the shore of Selfjord, in a shelter near the pontoon.
Duration/degree of difficulty: 5 or 6 hours, taking your time.
Supplies: No.
Logistics: Nothing to report. Ah, yes: there are chemical toilets alongside the shelter and an area where you can build a fire. And a fjord for fishing!
Alternative: No need for an alternative for this hike!
DAY 10
Itinerary: From Selfjordhytta take the trail to Kjerkforden – take the boat to Reine
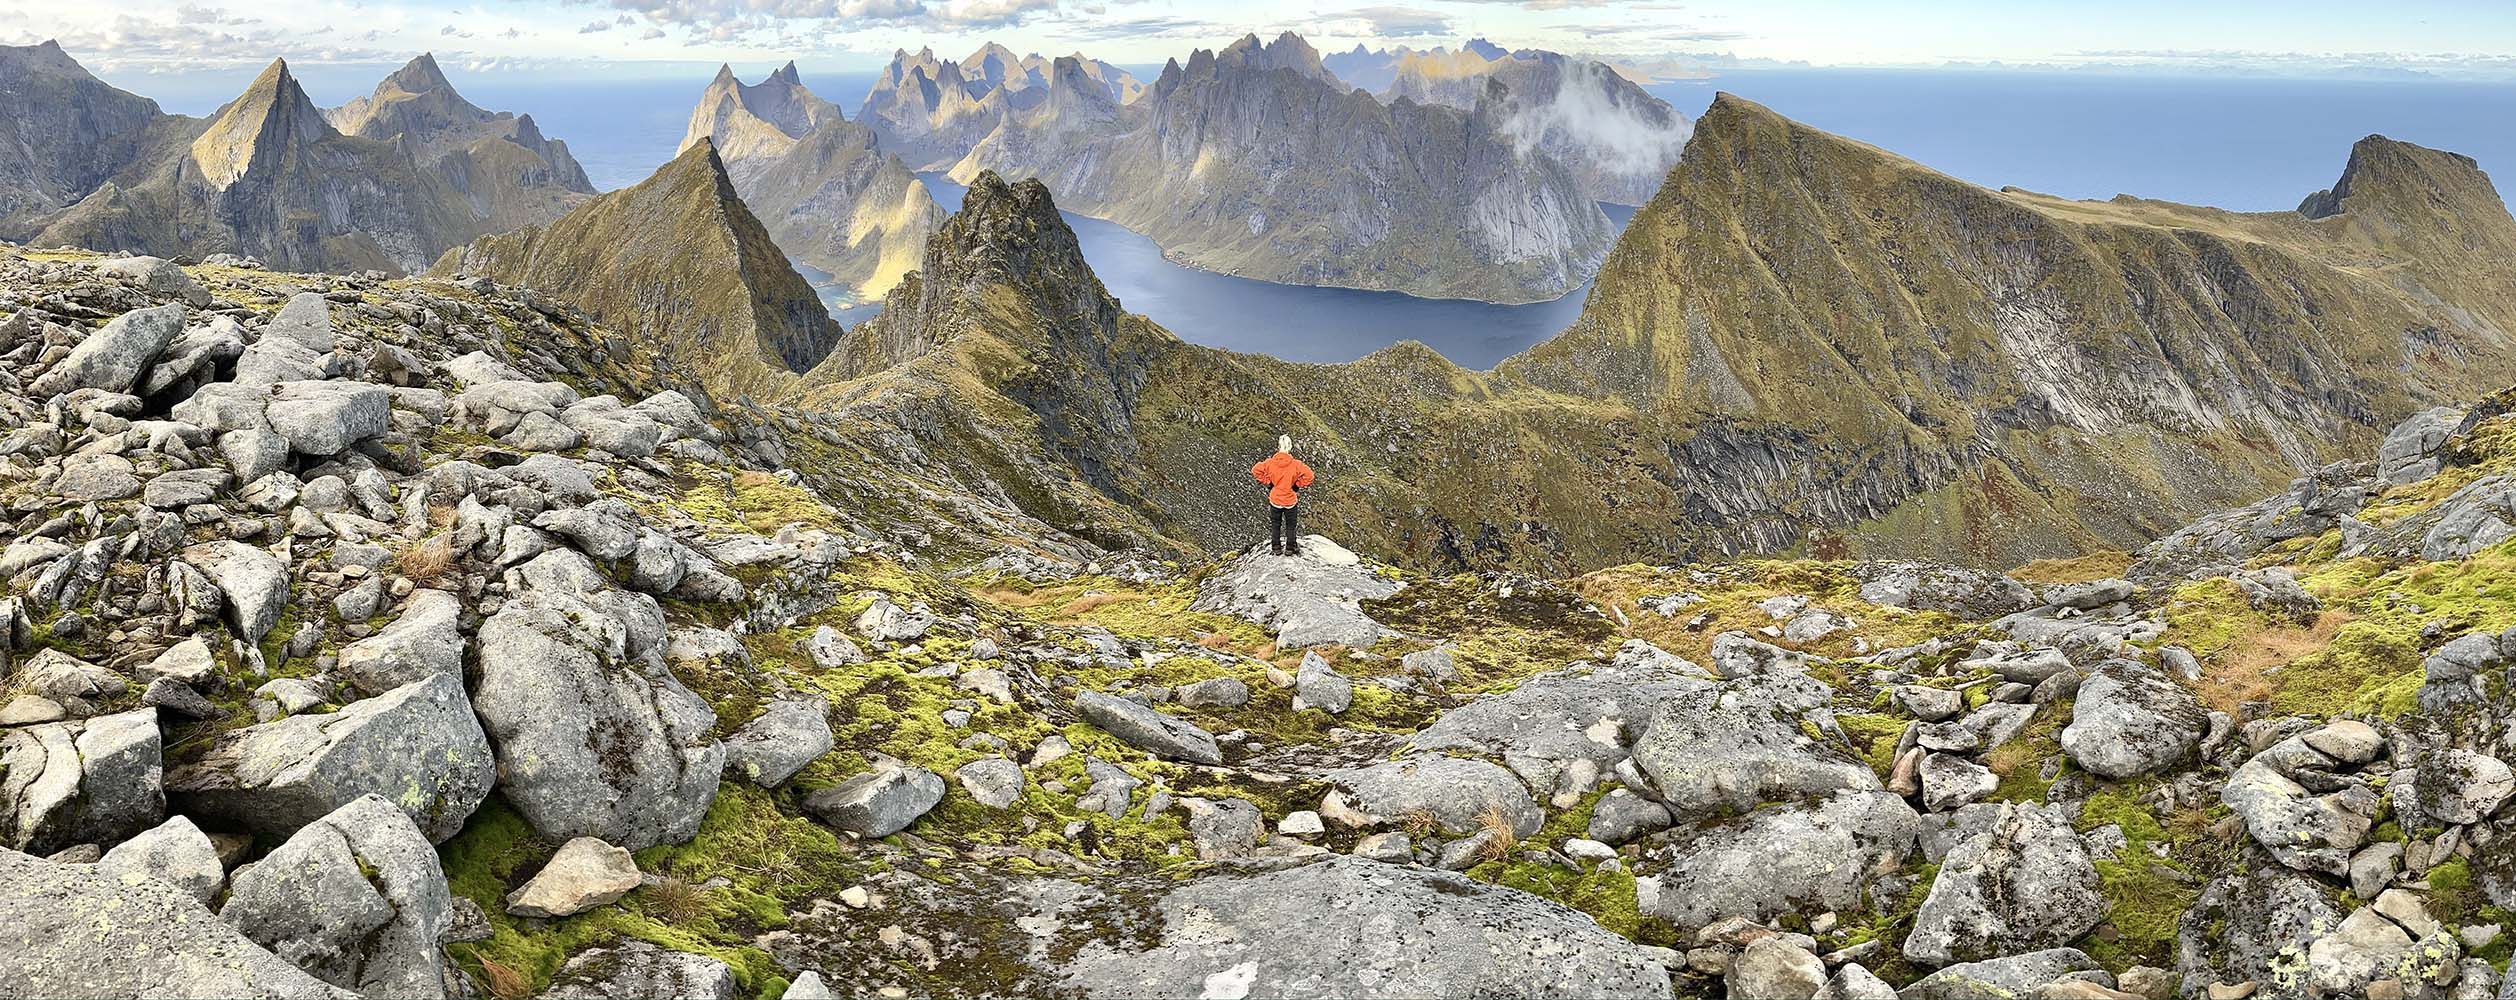
Description: Another very beautiful hike: you begin by going around the fjord through the dwarf birch forest on a trail that requires a certain amount of skill. Then you climb the first narrow stretch to a lovely mountain lake before beginning to climb the pass that leads towards the golden sand beach of Horseidvika. Once on the ridge it is possible climb several small peaks that offer breath-taking panoramic views over the jagged landscape or the island of Moskenes. Take the really nice trail on the hillside to the second pass leading to Horseidvika. The approach to the beach is magnificent. The hike ends in a small pass that leads to the village of Kjerkfjord from where you take the boat to Reine.
Bivouac: On the outskirts of Reine, Sorvagen… otherwise see the alternative below.
Duration/degree of difficulty: 6 hours approximately, comfortably.
Supplies: No supplies in Kjerkfjord. Otherwise supplies possible in Reine and Sorvagen.
Logistics: Don’t miss the boat to Kjerkfjord! Find out the times and try to get there early.
Alternative: On the boat to Reine you can ask to be dropped off in Tennes and then walk to the power station (at the end of forsfjorden), if the boat can’t drop you there. From the power station follow the water outflow (south/south-west) until you meet the trail – take the trail towards Hermannsdalstinden. Pitch your tent on the foothills of the summit.
DAY 11 (if alternative day 10)
Itinerary: From the bivouac climb Hermannsdalstinden, weather permitting (without a rucksack) – climb back down to the bivouac and pack up – take the trail again to Munkabu – climb Munken – climb back down to Sorvagen
Bivouac: In Sorvagen.
Duration/degree of difficulty: I estimate a minimum 8 or 9 hours walking for this hike. Big climb ahead (around 1000 or 1200 metres uphill).
Supplies: In Sorvagen.
Logistics: Nothing to report!
The whole show!
- Hiking in mountains with your house on your back: muscle and strong nerves…
A solo crossing in these latitudes almost immediately means a very heavy rucksack. In theory there is no such thing as bad weather, only bad equipment. With weather that changes as quickly as it does here you need suitable equipment. And everything is carried by one person: camp stove, tent, food, first-aid kit, etc. In these conditions you really have to allow for the weight of the rucksack in order to gauge your hikes. And I find this itinerary really suited to carrying such equipment: apart from the odd exception, the stages are neither too long nor too demanding and there are relatively few real uphill climbs. The weight of the rucksack should, however, be taken into consideration.
- A demanding terrain that requires a certain concentration
The terrain of the Lofoten Islands is not impossible. On the other hand, it is demanding and sometimes requires a great deal of concentration, particularly if you are hiking alone (the weight of your rucksack may have something to do with this). The terrain alternates between peat bogs, trails through the undergrowth, tracks that run across ridges, steep slopes to climb and wide open spaces. The difficulty may result simultaneously from:
- Ground that gives virtually no grip (the layer of humus is very thin), particularly in the mountains,
- Rocks that become real ice-skating rinks when it rains (they are covered with moss, lichen and/or algae),
- Holes (literally) that can sometimes be surprising in the ground, behind a rock, a root, etc.,
- The effort required in order to jump from one patch of grass to the next when crossing peat bogs, and the understanding of how to read the land that is required!
- The slippery, dangerous roots found throughout trails through the undergrowth,
- Scree which, not content with being real ice-skating rinks as they are, give no grip and move a lot, and where it is therefore possible to lose your footing.
The demanding terrain of the Lofoten Islands therefore requires considerable concentration. You always have to watch where you are stepping and cannot therefore always enjoy the landscape when walking. On the other hand, it’s a terrain which, due to the fact that it requires certain skill, becomes extremely rewarding when you get used to it!
- Those mischievous “troll trails”
In the Lofoten Islands, like elsewhere in Norway and in most Scandinavian countries, I have found that legends around trolls and other mountains elves are still alive in popular tradition. It is said, for example, that trolls appear in the distance and then disappear to tease walkers. I myself have not seen any trolls and so have not been a victim of their pranks!
On the other hand, in fifteen days I have been surprised by the trails which do not seem to hesitate at appearing and then disappearing when they feel like it! It’s not unusual to be on a trail which becomes a small path, then nothing for several kilometres until you come across another trail.
A considerable part of the crossing is therefore off-piste. You therefore need a good sense of direction and be capable of understanding the terrain, which can be read fairly easily: most of the paths you need to take are clear.
- Wet feet: the inevitable sponge effect!
I might as well warn you immediately: given the type of terrain and the unpredictable nature of the trails you must enjoy walking with wet feet, take bad luck in your stride and/or hope for fine weather! The Lofoten Islands are like a giant sponge. It’s therefore a good idea to take a spare pair of shoes if you want to stay dry. But it’s all much easier if you avoid the peat bogs…
- Pleasures of the road:
Given the layout of the Lofoten Islands certain stretches of road cannot be avoided, particularly at the end of a hike and you just have to put up with it.
The advantage of the end of hikes – other than those, like when you get to Ramberg, that are on the horrible E10 – is that they are restful: you don’t have to watch where you are walking and so can enjoy the view. It’s perhaps also the time to listen to a little music, it covers the traffic noise.
I also recommend you take another pair of shoes, such as trainers or running shoes, as well as walking boots for extra comfort.
- If you enjoy fresh food (and are the fisher-gather type)
If you know how to fish, in the Lofoten Islands you are sure of eating fresh fish every evening! I have to say, much to my regret, that I didn’t know how to.
In the right season you also find a lot of mushrooms. I’m not an expert but I think that if you know even a little about the different varieties such as ceps and chanterelles you can also cook them every evening!
Again during the summer there are a lot of berries to be found all over the mountains, particularly my favourites: Arctic berries (also called “peat bog brambles”). If you want to eat fresh fruit you just have to crouch down a little.
To sum up, the Lofoten Islands are an ideal place for fisher-gatherers! All you need is a pack of freeze-dried pasta, a small tub of cream and salt and pepper!
- Hitchhiking in Norway…
Norwegians don’t go in for hitchhiking, at least they are not very keen on it. Only half of the people who stopped to pick me up during my crossing were Norwegian. It’s particularly frustrating given that most of them are on their own in huge cars! You must therefore expect to have to wait. Buses, in certain situations, may be a good option (between Leknes and Napp for example).
- Let’s get down to business: how much does the crossing cost?
By stretching my holiday budget as far as it would go, I managed to find a flight for € 550 and the whole stay cost € 850 for the 9–day crossing, including the return bus trip. With that I was still able to include a pizza in Leknes and fish and chips in Nusfjord (both meals were washed down with a refreshing beer)!
- Relationship with time or the advantages of constant daylight
If, like me, you do the crossing in summer you can take advantage of the constant daylight. And that presents considerable advantages: it’s never night (you never get caught in the dark), and there are no huge drops in temperature when the sun sets (only a little dew, for example, if you decide to sleep under the stars in dry weather). If you get lost in the mountains in fog, for example (which happened to me), there’s no need to panic; if the worst comes to the worst you get back a bit later than planned. So on the whole it’s much better.
And it also enables you to adjust your timing exactly to what you want to do. The only real constraint is managing the travelling time so that you don’t miss the opening times of the shops where you buy your supplies. Or to arrive on time for the boat to Kjerkfjord. Other than these few time constraints constant daylight means total freedom!
And incredible atmospheres. I completed a few hikes quite late (between 1 am and 3 am), and saw the most fantastic light… It seems to me that when you are in the Lofoten Islands, if you organise your day as though you had to stick to French daylight hours you will not take full advantage of the Arctic latitudes.
To end this point, crossing in summer offers a relationship with time and the countryside that is so expanded… It’s really fantastic because you are never in a hurry. Even though this type of holiday may require a certain effort, you nevertheless get back to the real value of time! And that’s worth a lot…
- Unspoilt nature that is accessible and in which there are relatively few dangers
In northern Norway there are bears, lynx, mosquitos (fifteen or so different species, each more ferocious than the last), midges, black flies, … without mentioning the temperatures that can plummet on the continent, even in summer.
In the Lofoten Islands the impact of the Gulf Stream ensures higher temperatures (which doesn’t mean you shouldn’t be equipped because it can drop from 15-18° to 5-8° in less than an hour when the wind get up and the sky gets cloudy and/or it begins to rain…). And you don’t come across any bears, lynx or mosquitos (or very few), midges, black flies or other insects that sting… In other words, in the Lofoten Islands nature is unspoilt but not hostile. Unspoilt, very accommodating nature. Unspoilt nature waiting to be discovered by the curious. Unspoilt nature without danger. Who could ask for more?
When it boils down to it, you just have to enjoy having wet feet.
- Three weeks before you leave, pray to the Sun God for nice weather
Of the 9 days of my crossing, I had unbroken sunshine for 6 consecutive days and only 2 days of really bad weather (rain, wind, fog, cold).
It’s true that the good weather made the crossing a lot easier. The same route in the rain, cold and damp for nine days would have made it much less pleasant.
But, unless you are unlucky, it doesn’t rain continuously in the Lofoten Islands, far from it. The end of May and the month of June are, however, the best periods to travel.
- Bivouac ? Is that what you said?
Throughout the crossing I slept in three different campsites, I was lucky enough to find two makeshift shelters for the two most difficult nights and I slept under the stars for three nights (the weather conditions were suitable). I did not therefore have any problems.
On the other hand, I’m writing this short paragraph just to warn you: it is not always easy to find a good spot to pitch your tent. The peat bogs, forests and hilly terrain don’t help. And if you find flat, grassy areas they are often private property.
So don’t be surprised if you have to search for a while before you find the perfect spot!
- More general impressions (I will try to sum up!)
If I were to try to sum up, firstly I would say that the crossing route is perfectly feasible in terms of physical effort and is very well organised (even though you can improve it to suit you). The two main difficulties are carrying your rucksack, and identifying map references and the nature of the terrain.
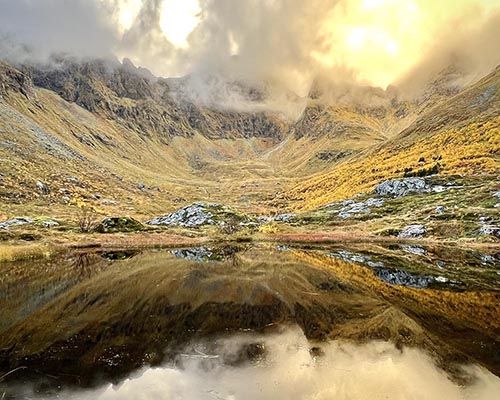
Even though the landscapes are not that varied if you consider the route as a whole, they are nevertheless on a large scale and can offer a wide variety of conditions in a single day: you can go from a peat bog to a mountain lake surrounded by a dwarf birch forest before reaching a more alpine setting when you climb to more mountainous altitudes, followed by a beautiful golden sand beach around a turquoise lagoon… all of that before reaching the shores of a fjord that reflects all the surrounding summits!
Another aspect that struck me is the relationship with time. In the summer it’s different and I found it particularly calming. And even though you always come across a sign of civilisation at some point in the day, you still feel immersed in nature which is genuinely unspoilt, and yet not hostile.
The crossing is great and provides fantastic mountain experiences to those who venture on the trip. I personally had 10 days of real joy. I found what I was looking for and I can say that I really made the most of it! In terms of budget, it’s also a cheaper way of exploring Norway …
One final detail: there are a lot of road stages on this route, even though they are generally short. This is as a result of the landscapes of the Lofoten Islands and I believe that certain sections cannot be avoided. Other than the main road (the notorious E10) however, there is not usually much traffic. It would seem a pity not to do this magnificent crossing for this reason. But with a little music and a pair of suitable shoes for walking on asphalt I even found that the end of the hikes were restful (because the terrain is far less demanding!).
I can’t recommend this crossing of the Lofoten Islands highly enough: it’s a joy. And for those who are scared of feeling lonely, you nevertheless meet people, whether hitchhiking, on the trails, in campsites… even though you are on your own most of the time.
To conclude, I highly recommend this crossing of the Lofoten Islands. With all due respect to the trolls and elves… it’s magical.
Geoffroy
")


 Day by day
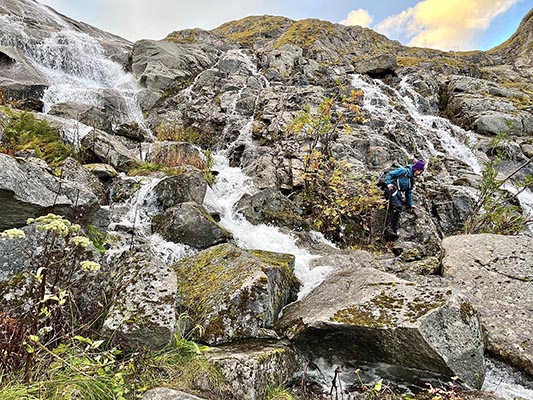 Day 3, Stage 9 commenced with a steep decent to the waterfall off the north western edge of Tennesvatnet. Water spayed everywhere with fierce winds. The most obvious path down led us to cross the waterfall and due to wet and windy conditions it looked dangerous so we decided to turn back to find an alternative (marked on our map). In dryer conditions it might have been the better option. The alternative was the hydro-power pipe-line. This was steep and slippery but manageable. Some red trail markers led us down this was but the wooden makeshift ladder someone had made long ago was all broken up. The decent required a bit of scrambling and passing over our heavy bags. Getting to the fjord edge we found a heap of large mussels at low tide and so rewarded ourselves with a big steamy breakfast. The description on the website had said it would take 45 min to get down, it took us almost twice that time. The 3.5 km walk along the edge of Forsfjorden was extremely slow going to start with but improved closer to Vindstad.
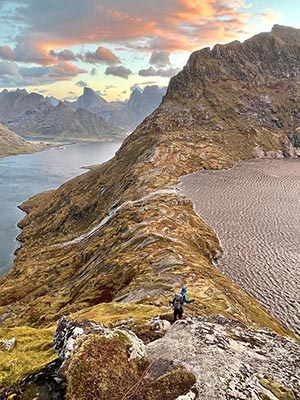 The ferry connection did not work for us. The next ferry that day meant waiting 2.5 hours and then only getting to Reine and waiting there til the next day to get the ferry to Kjerjfjorden. So we continued along from Vindstad walking up Bunesfjorden and over to the beach views of Buneset. This meant we had to hike up and over the pass at Helvetestinden, the views were amazing totally worth it. We attempted to get up to the summit however the gale force winds almost blew us off out feet and we decided to continue down into the valley to find camp before the light faded. Luckily the decent was sheltered from the highest winds. There was a very rough foot pad leading us down but we saw no cairns. The ground was slippery in places and very very steep, but we were able to zigzag down avoiding the dangerous rocky slabs. We have done a heap of this type of hiking before and we felt pretty comfortable slowly picking our was down the steepest sections with the aid of walking poles. If it had been raining/much wetter ground I think it might have been impassable. After searching for about half and hour we found some shelter for our tent behind a huge set of boulders about 500m from the village at Kjerkford. The majestic mountains and high cliffs here were so humbling.


